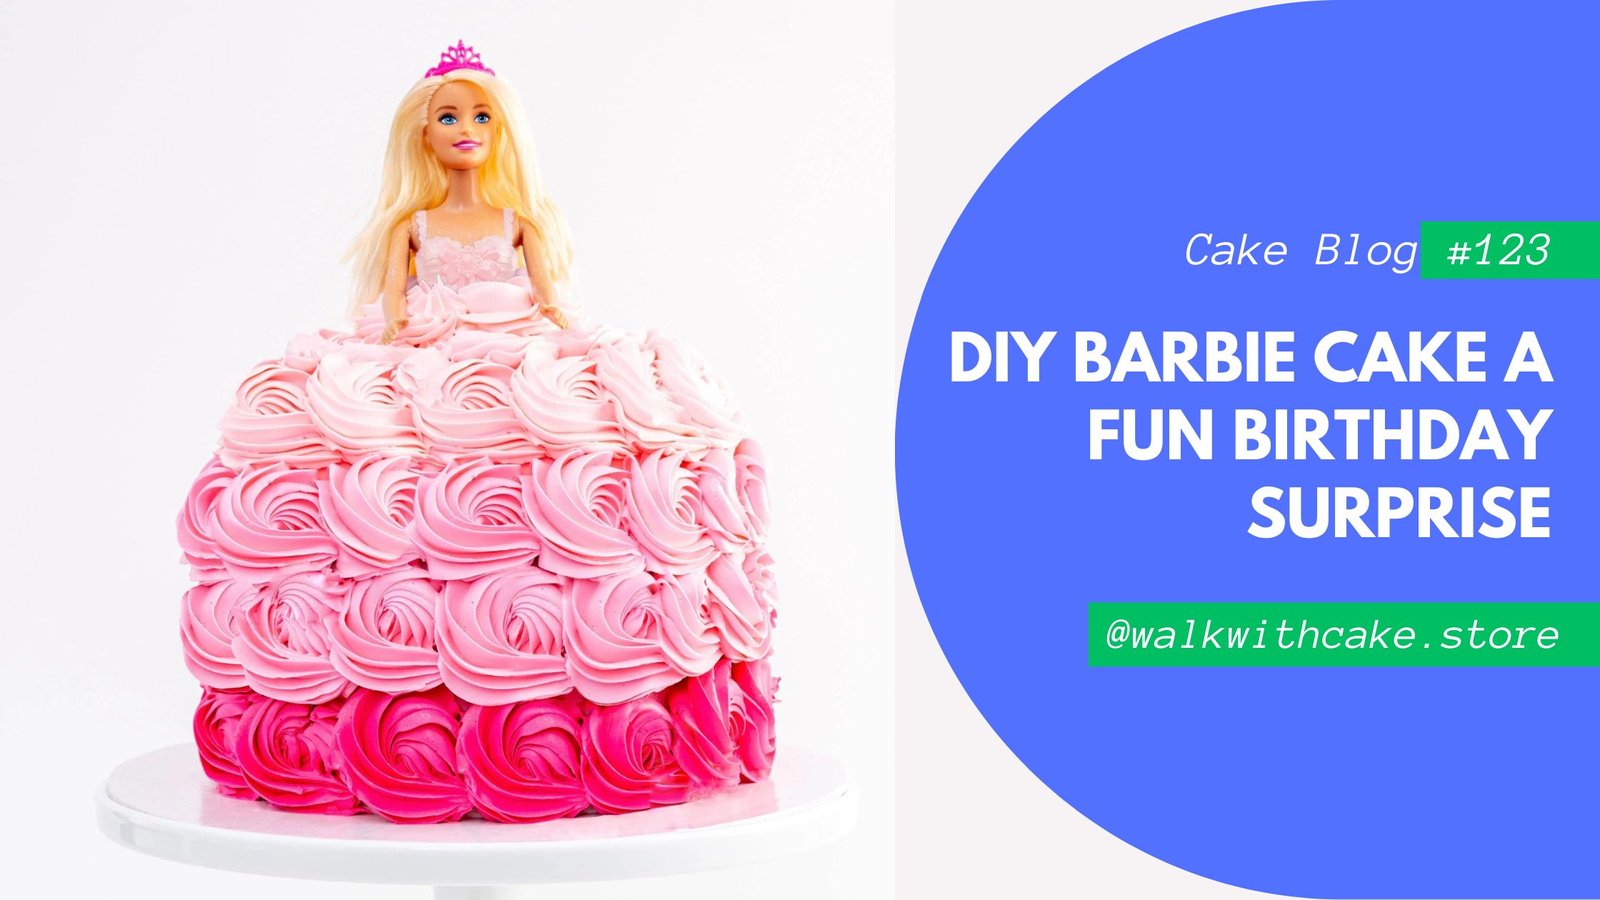
DIY Barbie Cake: A Fun Birthday Surprise
Introduction to Barbie Cakes
A DIY Barbie cake is a perfect centerpiece for a little girl’s birthday party. These cakes combine the charm of a Barbie doll with the deliciousness of a homemade cake, creating a delightful and memorable treat. Making a Barbie cake at home can seem daunting, but with some basic tools and a bit of creativity, it is a fun and rewarding experience. This guide will take you through the entire process, from gathering ingredients to adding the final decorative touches.
Gathering Ingredients and Tools
Before you start baking, gather all the necessary ingredients and tools. Here’s what you’ll need:
- Ingredients:
- Cake mix or your favorite cake recipe
- Butter or oil
- Eggs
- Milk or water
- Food coloring (optional)
- Frosting (buttercream or fondant)
- Edible decorations (pearls, glitter, sprinkles)
- Tools:
- Dome-shaped cake pan
- Mixing bowls
- Electric mixer or whisk
- Cooling rack
- Serrated knife
- Piping bags and tips
- Spatula
- Barbie doll (with legs wrapped in plastic wrap)
Baking the Cake
Start by preparing your cake mix according to the instructions on the box or your recipe. Preheat your oven to the required temperature and grease your dome-shaped cake pan to prevent sticking.
Mix the Batter:
- Combine the cake mix, eggs, butter, and milk in a mixing bowl. Use an electric mixer or a whisk to blend until smooth. If you want to add some color to the cake, mix in a few drops of food coloring.
Bake the Cake:
- Pour the batter into the prepared pan, filling it about two-thirds full to allow room for rising. Bake for the recommended time, usually between 35-45 minutes. To check if the cake is done, insert a toothpick into the center. If it comes out clean, the cake is ready.
Cool the Cake:
- Once baked, let the cake cool in the pan for about 10 minutes before transferring it to a cooling rack. Allow it to cool completely before moving on to the next steps.
Assembling the Barbie Cake
With the cake baked and cooled, it’s time to assemble the Barbie cake. This part can be a bit tricky, but with patience and care, you can create a stunning cake dress for the Barbie doll.
Prepare the Doll:
- Wrap the lower half of the Barbie doll in plastic wrap to protect it from the cake and frosting. This also makes it easier to insert the doll into the cake.
Trim the Cake:
- Using a serrated knife, trim the bottom of the cake if necessary to create a flat surface. You can also level the top of the cake if it has domed during baking.
Create the Skirt:
- Cut a hole in the center of the cake large enough to fit the Barbie doll’s legs. Gently insert the doll into the cake, making sure it stands upright and stable.
Frosting the Cake
Frosting the cake is where you can let your creativity shine. You can use buttercream frosting for a classic look or fondant for a smoother, more polished finish.
Crumb Coat:
- Apply a thin layer of frosting all over the cake to seal in the crumbs. This is known as the crumb coat. Chill the cake in the refrigerator for about 15-20 minutes to set the frosting.
Final Layer:
- Apply a thicker layer of frosting over the crumb coat, using a spatula to smooth it out. If you’re using fondant, roll it out to the desired thickness and drape it over the cake, smoothing it down with your hands.
Decorate the Dress:
- Use colored frosting to create the dress design. You can pipe patterns, add ruffles, or use edible decorations like pearls and glitter to enhance the look. Be creative and have fun with this step!
Adding Final Touches
To make your Barbie cake truly special, add some final touches that will make it stand out.
Accessories:
- Add accessories like a tiara, necklace, or other small decorations to the Barbie doll. You can make these from fondant or purchase edible decorations.
Display:
- Place the finished cake on a decorative cake stand or platter. Surround it with additional decorations like flowers or small candies to enhance the presentation.
Personal Touch:
- Consider adding a personalized message or the birthday girl’s name to the cake using icing or fondant letters.
Tips for Success
Plan Ahead:
- Gather all your ingredients and tools before you start to ensure a smooth baking and decorating process.
Stay Organized:
- Keep your workspace clean and organized to make the decorating process easier.
Be Patient:
- Take your time with each step, especially when assembling and decorating the cake.
Practice:
- If you’re new to cake decorating, practice piping patterns and working with fondant on a small piece of cake or a practice board.
Creating a DIY Barbie cake is a fun and creative project that results in a beautiful and delicious centerpiece for a birthday celebration. With these tips and steps, you’ll be able to create a memorable and stunning cake that will delight any Barbie fan.
Advanced Techniques for Decorating Your Barbie Cake
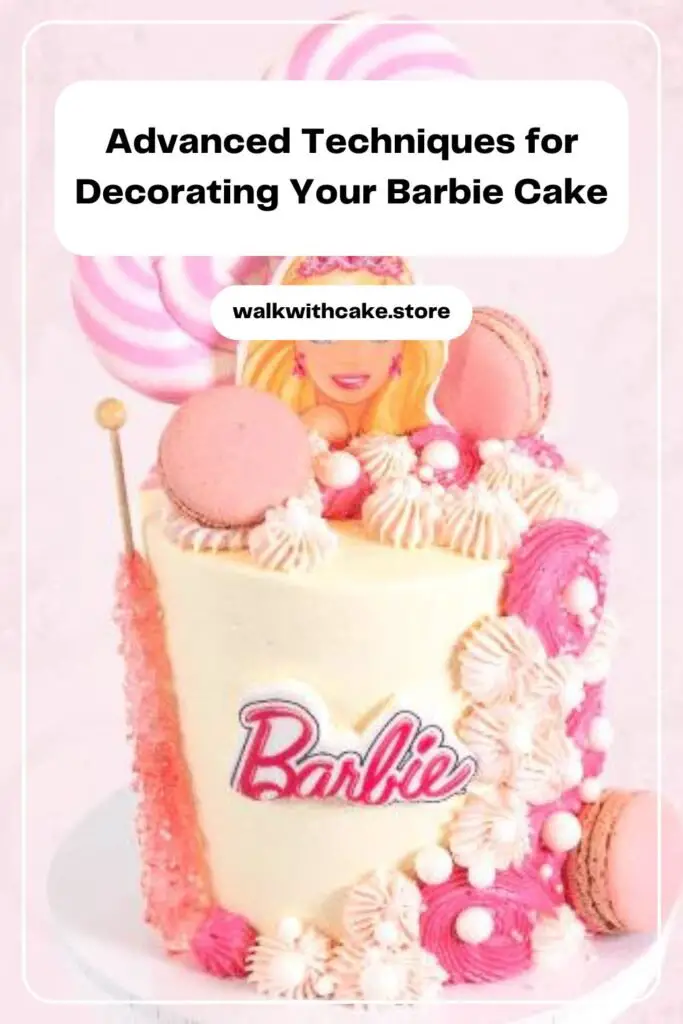
Once you’ve mastered the basic Barbie cake, you can explore more advanced decorating techniques to elevate your cake-making skills. Here are some ideas to take your Barbie cake to the next level:
Using Fondant for a Smooth Finish
Fondant can give your Barbie cake a polished and professional look. It’s a bit more challenging to work with than buttercream, but with some practice, you can achieve stunning results.
- Preparing the Fondant:
- Knead the fondant until it’s smooth and pliable.
- If the fondant is too sticky, dust your work surface and rolling pin with powdered sugar.
- Roll out the fondant to about 1/8-inch thickness.
- Covering the Cake:
- Carefully lift the rolled fondant and drape it over the cake.
- Smooth the fondant over the cake using your hands or a fondant smoother, starting from the top and working your way down.
- Trim any excess fondant from the bottom edge with a sharp knife or pizza cutter.
- Creating Fondant Decorations:
- Use fondant cutters or molds to create shapes and decorations.
- Attach fondant decorations to the cake using a small amount of water or edible glue.
Adding Edible Glitter and Luster Dust
Edible glitter and luster dust can add a magical touch to your Barbie cake, making it sparkle and shine.
- Applying Edible Glitter:
- Lightly brush the areas where you want to apply glitter with a small amount of water or clear piping gel.
- Sprinkle edible glitter over these areas, tapping off any excess.
- Using Luster Dust:
- Mix luster dust with a few drops of clear alcohol (like vodka) to create a paint-like consistency.
- Use a food-safe brush to paint the luster dust onto the fondant or buttercream, adding shimmer and highlights.
Creating Intricate Piping Designs
Piping intricate designs can add elegance and detail to your Barbie cake. Use different piping tips and techniques to create beautiful patterns.
- Choosing Piping Tips:
- Use star tips for rosettes and ruffles.
- Use round tips for dots and lines.
- Use petal tips for creating flowers and ruffles.
- Practicing Piping Techniques:
- Practice piping on a piece of parchment paper before working on the cake.
- Maintain even pressure on the piping bag to ensure consistent designs.
- Design Ideas:
- Create a lace pattern on the dress with a small round tip.
- Pipe rosettes around the base of the cake for a floral border.
- Add ruffles to the dress using a petal tip for a more voluminous look.
Incorporating Sugar Flowers and Decorations
Sugar flowers and decorations can add a touch of elegance and realism to your Barbie cake. These decorations can be made from gum paste, fondant, or royal icing.
- Making Sugar Flowers:
- Roll out gum paste or fondant thinly and use flower cutters to create petal shapes.
- Use veining tools to add texture to the petals.
- Assemble the petals to form flowers, using edible glue to attach them together.
- Allow the flowers to dry and harden before placing them on the cake.
- Adding Sugar Flowers to the Cake:
- Arrange the sugar flowers around the base of the cake or on the dress.
- Use small clusters of flowers to create a bouquet effect.
Creating a Themed Barbie Cake
To make the cake even more special, consider incorporating a specific theme that the birthday girl loves. Here are some themed Barbie cake ideas:
- Princess Barbie Cake:
- Use pastel colors and lots of glitter.
- Add a fondant tiara and scepter.
- Create a castle backdrop using fondant or cardboard.
- Mermaid Barbie Cake:
- Use blue and green hues for the dress.
- Add fondant seashells, starfish, and pearls.
- Create a water effect using piping gel or blue fondant.
- Fairy Barbie Cake:
- Use light and airy colors like pink, lavender, and white.
- Add fondant or gum paste wings to the Barbie doll.
- Decorate with edible flowers, butterflies, and glitter.
- Ballerina Barbie Cake:
- Use soft pink and white colors for the dress.
- Add a fondant tutu around the waist of the Barbie doll.
- Create ballet slippers using fondant.
Troubleshooting Common Issues
Even with careful planning, you might encounter some challenges while making your Barbie cake. Here are some common issues and how to solve them:
Cake Collapsing or Leaning
If your cake is collapsing or leaning, it might be due to an unstable base or improper cake structure.
- Solution:
- Make sure the cake layers are level and the base is sturdy.
- Use dowels or cake supports to provide additional stability, especially for taller cakes.
Fondant Cracking or Tearing
Fondant can crack or tear if it’s too dry or not handled properly.
- Solution:
- Knead the fondant thoroughly before rolling it out.
- If it’s too dry, add a small amount of shortening to make it more pliable.
- Be gentle when draping fondant over the cake and smooth it carefully.
Frosting Not Sticking to the Cake
If the frosting isn’t sticking to the cake, it might be too cold or the cake might not be properly crumb-coated.
- Solution:
- Ensure the cake is at room temperature before applying frosting.
- Apply a crumb coat and let it set in the refrigerator before adding the final layer of frosting.
Decorations Sliding Off
If decorations are sliding off, the frosting might be too soft or the cake might not be properly chilled.
- Solution:
- Chill the cake before adding decorations to firm up the frosting.
- Use a small amount of edible glue or royal icing to secure decorations.
Personalizing Your Barbie Cake
Personalization makes your Barbie cake unique and special. Here are some ideas to tailor the cake to the birthday girl’s preferences:
Choosing Colors and Themes
Start by selecting colors and themes that the birthday girl loves. Incorporating her favorite colors and interests will make the cake more meaningful.
- Favorite Colors:
- Use her favorite colors for the frosting and decorations.
- Combine complementary colors to create a visually appealing cake.
- Theme Ideas:
- Choose a theme that reflects her hobbies or interests, such as princesses, mermaids, or ballerinas.
- Coordinate the cake theme with the party decorations for a cohesive look.
Adding Personalized Messages
Including a personalized message on the cake adds a special touch. Here’s how to do it:
- Using Fondant Letters:
- Roll out fondant and use letter cutters to create the birthday girl’s name or a special message.
- Arrange the letters on the cake or on a fondant banner.
- Piping the Message:
- Use a small round piping tip to pipe the message directly onto the cake.
- Practice piping on parchment paper before writing on the cake.
Incorporating Photos
Adding edible photos to the cake can make it even more personal and unique.
- Edible Photo Sheets:
- Print an edible photo of the birthday girl or a favorite image onto edible photo sheets.
- Place the photo on a flat area of the cake and gently press it into the frosting.
- Photo Frame:
- Create a fondant or buttercream frame around the edible photo for an elegant touch.
Advanced Decorating Techniques
Creating Ruffles and Layers
Ruffles and layers can add depth and texture to the Barbie cake, making it look more elaborate.
- Fondant Ruffles:
- Roll out fondant and cut it into strips.
- Ruffle the strips by pinching and folding them, then attach them to the cake in layers.
- Buttercream Ruffles:
- Use a petal piping tip to pipe ruffles onto the cake.
- Start at the bottom and work your way up, layering the ruffles for a voluminous effect.
Using Isomalt for Edible Decorations
Isomalt is a sugar substitute that can be melted and molded into beautiful, glass-like decorations.
- Melting Isomalt:
- Melt isomalt crystals according to the package instructions.
- Pour the melted isomalt onto a silicone mat and let it cool slightly.
- Creating Decorations:
- Shape the isomalt into flowers, gems, or other decorations using silicone molds or by hand.
- Allow the decorations to cool and harden before placing them on the cake.
Making the Cake Interactive
Adding interactive elements to the Barbie cake can make it even more fun for the birthday girl and her guests.
Pull-Apart Cupcake Skirt
Create a pull-apart cupcake skirt around the Barbie doll for an interactive twist.
- Baking Cupcakes:
- Bake a batch of cupcakes and arrange them around the base of the Barbie doll.
- Decorate each cupcake to match the theme of the cake.
- Assembling the Skirt:
- Arrange the decorated cupcakes closely together to form the skirt.
- Use frosting to secure the cupcakes in place.
Hidden Surprises
Incorporate hidden surprises inside the cake for an extra element of fun.
- Candy-Filled Cake:
- Hollow out the center of the cake and fill it with candy or small toys.
- Cover the hole with a layer of cake and frosting.
- Message Scrolls:
- Write special messages on small pieces of edible paper.
- Roll the messages and place them inside the cake layers for guests to find.
Final Touches and Presentation
The final touches and presentation of the Barbie cake are just as important as the decorating process. Here are some tips to make your cake look professional and impressive.
Displaying the Cake
Choose a beautiful cake stand or platter to display your Barbie cake.
- Cake Stand:
- Use a sturdy, decorative cake stand that complements the cake’s theme.
- Ensure the cake stand is large enough to support the cake’s weight.
- Platter:
- Decorate the platter with additional elements, such as flowers, candies, or themed decorations.
Adding Edible Glitter and Sprays
Edible glitter and sprays can add a final touch of sparkle and glamour to your Barbie cake.
- Edible Glitter:
- Lightly brush the cake with a small amount of water or edible glue where you want to apply the glitter.
- Sprinkle the edible glitter over the cake, tapping off any excess.
- Edible Sprays:
- Use edible color sprays to add a shimmer or pearlized finish to the cake.
- Hold the spray can at a distance and lightly mist the cake for an even application.
Hosting a Barbie-Themed Party
Complement your Barbie cake with a Barbie-themed party to create a magical and memorable celebration.
Decorations and Party Supplies
- Decorations:
- Use pink, purple, and glittery decorations to match the Barbie theme.
- Incorporate Barbie dolls and accessories into the decor.
- Party Supplies:
- Use Barbie-themed plates, cups, napkins, and tablecloths.
- Provide Barbie-themed party favors for the guests.
Activities and Games
Plan fun activities and games that align with the Barbie theme to keep the guests entertained.
- Dress-Up Station:
- Set up a dress-up station with Barbie costumes and accessories.
- Provide a mirror and space for the guests to try on different outfits.
- Craft Station:
- Create a craft station where guests can make their own Barbie accessories or decorate mini cakes.
- Provide materials like glitter, stickers, and markers for decorating.
Party Favors
Send the guests home with Barbie-themed party favors to remember the special day.
- Favor Bags:
- Fill favor bags with Barbie-themed items, such as small dolls, accessories, and stickers.
- Include a thank-you note from the birthday girl.
- Personalized Gifts:
- Consider personalized gifts, like custom Barbie t-shirts or mugs, for an extra special touch.
Exploring More Advanced Techniques for Your Barbie Cake
To truly impress with your Barbie cake, let’s dive into some even more advanced techniques. These methods can help you create a cake that looks like it was made by a professional baker.
Creating Realistic Fondant Details
Fondant allows for intricate detailing, making it perfect for creating realistic elements on your Barbie cake.
- Texturing Fondant:
- Use texture mats or rolling pins with patterns to create realistic textures on the fondant.
- Apply these textures to fondant pieces before adding them to the cake.
- Painting Fondant:
- Mix gel food coloring with a few drops of clear alcohol to create edible paint.
- Use fine-tip brushes to paint details onto the fondant, such as lace patterns, floral designs, or intricate dress details.
- Using Silicone Molds:
- Silicone molds can help you create detailed fondant decorations like flowers, leaves, and jewelry.
- Dust the molds with cornstarch before pressing in the fondant to ensure easy removal.
Sculpting with Rice Krispies Treats
Rice Krispies treats can be sculpted into shapes and covered with fondant to add dimension to your cake.
- Making Rice Krispies Sculptures:
- Prepare a batch of Rice Krispies treats and let them cool slightly.
- Mold the treats into the desired shapes, such as a handbag, shoes, or additional dress elements.
- Covering with Fondant:
- Once the Rice Krispies treats are shaped and firm, cover them with a thin layer of buttercream to smooth the surface.
- Roll out fondant and cover the sculptures, smoothing and shaping as needed.
Airbrushing for Professional Finish
Airbrushing can give your cake a professional, polished look by adding depth and shading.
- Setting Up Your Airbrush:
- Use an airbrush kit designed for cake decorating and food-safe airbrush colors.
- Practice on a piece of parchment paper or a practice cake to get a feel for the airbrush.
- Applying Airbrush Color:
- Start with light, even layers of color, building up gradually to avoid oversaturation.
- Use the airbrush to add shading, highlights, and gradients to the cake for a more realistic look.
Creating Edible Fabric for the Dress
Edible fabric made from wafer paper or gelatin sheets can add a delicate and realistic touch to your Barbie cake.
- Wafer Paper Fabric:
- Cut wafer paper into strips or shapes to mimic fabric.
- Use a mixture of water and food coloring to paint the wafer paper, giving it a soft, fabric-like appearance.
- Attach the wafer paper to the cake using a small amount of piping gel or water.
- Gelatin Sheets:
- Dissolve gelatin in water and spread it thinly on a non-stick surface.
- Once it sets, peel it off and cut it into strips or shapes.
- Drape the gelatin sheets over the cake to create realistic fabric folds and ruffles.
Integrating Lights for a Magical Effect
Incorporating small LED lights can make your Barbie cake truly magical, especially for evening celebrations.
- Choosing LED Lights:
- Use food-safe, battery-operated LED lights.
- Choose lights that are small and easy to conceal within the cake or decorations.
- Incorporating Lights:
- Carefully plan where to place the lights to enhance the cake’s design.
- Create small holes or channels in the cake to hide the wires and battery packs.
- Ensure that the lights do not come into direct contact with the cake itself to keep it safe to eat.
Creating a Gravity-Defying Barbie Cake
Gravity-defying cakes are a showstopper and can make your Barbie cake even more impressive.
- Planning the Structure:
- Sketch out your design and determine where support structures are needed.
- Use food-safe dowels, cake boards, and other supports to create a stable base.
- Building the Cake:
- Assemble the cake around the support structures, carving and shaping as needed to achieve the desired effect.
- Use sturdy cake layers and a firm frosting to ensure the cake holds its shape.
Detailed Instructions for Specific Themes
Let’s explore detailed instructions for some popular Barbie cake themes to give you more inspiration.
Princess Barbie Cake
A Princess Barbie cake is a classic choice that never fails to impress.
- Designing the Dress:
- Use pastel colors like pink, lavender, and blue for a royal look.
- Add fondant ruffles, lace patterns, and pearl accents to the dress.
- Creating the Crown:
- Make a fondant or gum paste crown, using edible gold paint for a regal touch.
- Place the crown on the Barbie doll’s head or at the base of the cake.
- Adding Royal Accessories:
- Add a fondant scepter and royal cape to complete the princess look.
- Use edible glitter and luster dust to add sparkle and shine.
Mermaid Barbie Cake
A Mermaid Barbie cake brings a touch of underwater magic to the party.
- Designing the Tail:
- Sculpt the lower half of the cake into a mermaid tail shape using Rice Krispies treats or cake pieces.
- Cover the tail with fondant and add scale details using a cutter or knife.
- Creating Ocean Waves:
- Use blue and turquoise buttercream to create ocean waves around the base of the cake.
- Add edible pearls, starfish, and seashells for a marine theme.
- Adding Finishing Touches:
- Use edible shimmer sprays to give the tail and waves a sparkling finish.
- Add a fondant seashell bikini top and seaweed decorations to complete the mermaid look.
Fairy Barbie Cake
A Fairy Barbie cake brings an enchanting woodland feel to the celebration.
- Designing the Dress:
- Use light and airy colors like pink, lavender, and white.
- Add delicate fondant flowers and butterfly decorations to the dress.
- Creating Fairy Wings:
- Make fairy wings from gelatin sheets or wafer paper.
- Attach the wings to the Barbie doll’s back using edible glue or piping gel.
- Adding Woodland Elements:
- Decorate the cake with fondant mushrooms, flowers, and vines.
- Use edible glitter to add a magical, sparkling effect.
Tips for Perfect Execution
Achieving a perfect Barbie cake takes practice and attention to detail. Here are some additional tips:
- Practice Patience:
- Take your time with each step, especially when decorating.
- If something doesn’t turn out as expected, don’t be afraid to start over.
- Keep It Cool:
- Work in a cool environment to prevent the frosting and fondant from becoming too soft.
- Chill the cake between decorating steps to keep it stable.
- Stay Organized:
- Keep all your tools and ingredients organized and within reach.
- Clean as you go to avoid clutter and mess.
- Ask for Help:
- If you’re new to cake decorating, don’t hesitate to ask for help or take a class to learn new techniques.
More Specific Tips, Tricks, and Creative Ideas for Your Barbie Cake
To ensure your Barbie cake stands out, let’s dive into additional specific tips, tricks, and creative ideas. These suggestions will help you refine your technique and add unique elements to your cake.
Perfecting Your Cake Base
A stable and delicious cake base is essential for your Barbie cake.
Choosing the Right Cake Recipe
Select a cake recipe that is sturdy enough to hold the Barbie doll and decorations.
- Vanilla or Chocolate Cake:
- These classic flavors are always a hit and provide a solid base.
- Consider adding a flavor twist, such as vanilla bean or chocolate fudge.
- Dense Cakes:
- Pound cake or butter cake recipes work well due to their density.
- Avoid light and airy cakes like angel food or sponge cakes, which may not support the weight.
Ensuring Even Layers
Even cake layers are crucial for a professional-looking cake.
- Leveling the Cake:
- Use a serrated knife or a cake leveler to trim the top of each cake layer.
- This ensures each layer is flat and even, providing a stable base for stacking.
- Using Cake Strips:
- Wrap cake strips around the cake pans to ensure even baking.
- These strips help the cake bake uniformly, preventing a domed top.
Advanced Decorating Ideas
Take your decorating skills to the next level with these advanced ideas.
Ombre Effect
Create a beautiful ombre effect on your Barbie cake.
- Choosing Colors:
- Select a gradient of colors from light to dark in your chosen palette.
- Pastels work well for a soft, elegant look, while vibrant colors add a playful touch.
- Applying Frosting:
- Start with the lightest color at the top of the cake and gradually add darker shades as you move down.
- Blend the colors where they meet using a spatula or a cake scraper for a seamless transition.
Quilted Pattern
A quilted pattern adds a touch of sophistication to your Barbie cake.
- Marking the Pattern:
- Use a ruler and a fondant tool to mark evenly spaced lines on the fondant-covered cake.
- Create a diamond-shaped pattern by marking lines in both directions.
- Adding Pearls:
- Place edible pearls or dragees at the intersections of the lines for an elegant look.
- Attach them with a small dab of edible glue or royal icing.
Creating 3D Elements
Adding 3D elements can make your Barbie cake more dynamic and visually interesting.
- Fondant Flowers:
- Create lifelike flowers using fondant or gum paste.
- Use flower cutters and shaping tools to add details and texture.
- Edible Jewelry:
- Mold fondant or isomalt into shapes like necklaces, earrings, and bracelets.
- Add edible glitter or luster dust for a sparkling effect.
Flavor Combinations
Consider unique flavor combinations to make your Barbie cake memorable.
- Strawberry and Lemon:
- A lemon cake with strawberry filling provides a refreshing and fruity combination.
- Use fresh strawberries and lemon zest for natural flavors.
- Chocolate and Raspberry:
- A rich chocolate cake with raspberry filling is a decadent choice.
- Use raspberry jam or fresh raspberries for the filling.
- Coconut and Pineapple:
- A tropical combination of coconut cake with pineapple filling adds an exotic twist.
- Use shredded coconut and pineapple chunks for texture and flavor.
Creative Presentation Ideas
Enhance the presentation of your Barbie cake with these creative ideas.
Themed Cake Boards
Decorate the cake board to match the theme of your Barbie cake.
- Princess Theme:
- Cover the cake board with fondant and add fondant decorations like castles, crowns, and jewels.
- Mermaid Theme:
- Use blue and green fondant to create an ocean scene.
- Add fondant seashells, starfish, and seaweed.
Multi-Tiered Cakes
For a grand presentation, create a multi-tiered Barbie cake.
- Designing the Tiers:
- The bottom tier can be a traditional round cake, while the top tier is the Barbie skirt.
- Decorate each tier to match the overall theme.
- Adding Supports:
- Use dowels and cake boards to support the upper tiers.
- Ensure the supports are properly placed to prevent the cake from collapsing.
Troubleshooting Common Issues
Here are some solutions to common problems you might encounter while making your Barbie cake.
Fondant Tearing
If your fondant tears while covering the cake:
- Solution:
- Roll the fondant to the right thickness (about 1/8 inch).
- Lift and drape the fondant carefully over the cake, avoiding excessive stretching.
Uneven Frosting
If your frosting appears uneven or bumpy:
- Solution:
- Apply a crumb coat first and chill the cake.
- Use a cake scraper or bench scraper to smooth the final layer of frosting.
Cake Leaning
If your cake leans or collapses:
- Solution:
- Ensure each layer is level and the cake is properly supported.
- Chill the cake between decorating steps to keep it stable.
Additional Resources
For more inspiration and guidance, consider these resources:
- Online Tutorials:
- YouTube and baking blogs offer a wealth of tutorials on cake decorating techniques.
- Look for videos specifically focused on Barbie cakes or similar themed cakes.
- Cake Decorating Classes:
- Local bakeries or culinary schools often offer classes on cake decorating.
- These classes can provide hands-on experience and personalized instruction.
- Cake Decorating Books:
- Books on cake decorating can provide detailed instructions and inspiration.
- Look for books with step-by-step guides and plenty of photos.
Conclusion
Creating a DIY Barbie cake is a delightful project that combines creativity, skill, and a love for baking. By incorporating these advanced techniques, unique flavor combinations, and creative presentation ideas, you can create a stunning cake that will be the highlight of any birthday celebration. Whether you’re making a simple cake or an elaborate multi-tiered masterpiece, the effort and love you put into it will result in a beautiful and memorable cake that will delight the birthday girl and all her guests. Enjoy the magical process of bringing your Barbie cake to life, and happy baking!